 how-to
How to Display Art Printed Puzzles at Home
Table of Contents
- Why Display Your Finished Puzzle as Wall Art
- Preparing and Securing Puzzle Pieces Before Display
- How to Glue a Puzzle for Framing
- How to Frame a Finished Puzzle
- How to Laminate a Puzzle for Protection
- Puzzle Display Ideas for the Wall
- Care and Long-Term Preservation
- Frequently Asked Questions
Last Updated: October 17, 2026
Why Display Your Finished Puzzle as Wall Art
A completed puzzle is more than just a hobby project. It's a finished work of art that deserves a place in your home. Display art printed puzzles to transform them from something you pack away into meaningful decor that tells your story.
When you finish a puzzle, you've invested hours of focus and creativity. That effort deserves recognition. Puzzles featuring fine art designs, like those from Lux Landscape Art, make stunning wall displays that spark conversation and add personality to any room.
The best part? You have endless options for how to display art printed puzzles. Whether you frame it, glue it, laminate it, or use a reversible method, your finished puzzle can become a centerpiece in your living room, bedroom, or office.
Preparing and Securing Puzzle Pieces Before Display
Before you commit to any display method, prep your puzzle carefully. Loose pieces fall apart. Dust collects in gaps. The wrong preparation ruins the finished look.
Start by letting your completed puzzle sit flat on a clean surface for 24 hours. This helps pieces settle and bond naturally. Check for any loose edges or corners that might shift.
Next, gently flip the puzzle face-down onto a clean cloth. This protects the front while you work on the back. Make sure your work surface is dust-free.
Choosing Between Glue and Glue-Free Methods
You have two main paths: permanent or reversible.
Glue methods lock pieces together forever. Once glued, you cannot rearrange or remove pieces. This works well if you love the puzzle and want it to last decades on your wall.
Glue-free methods use adhesive dots, spray adhesive, or mounting techniques that let you change or remove the puzzle later. This suits people who like to refresh their decor or aren't sure about long-term commitment.
Consider your lifestyle. Do you move frequently? Glue-free is smarter. Do you want a permanent art installation? Glue makes sense.
How to Glue a Puzzle for Framing
Gluing creates a solid, durable puzzle ready for framing. The process is straightforward but requires patience.
What you'll need:
- Wood glue or puzzle glue (specifically formulated for puzzles)
- A flat brush or foam applicator
- Clean cloth or paper towels
- Flat board or backing board
- Wax paper or plastic sheeting
Steps:
-
Lay the puzzle face-up on a clean, flat surface. Make sure all pieces are snug against each other with no gaps.
-
Apply glue to the back. Use a thin, even coat across the entire back of the puzzle. Work in sections if the puzzle is large. A foam brush helps you spread glue smoothly without soaking pieces.
-
Let it dry completely. Follow the glue manufacturer's instructions. Most wood glues need 24 hours. Puzzle-specific glues may dry faster.
-
Flip carefully once dry. The glued back should feel rigid. If pieces still shift, let it dry longer.
-
Trim excess glue. Once fully dry, scrape away any glue drips or edges with a plastic scraper. Sand lightly if needed.
The glued puzzle is now ready for framing or mounting directly to a wall.
How to Frame a Finished Puzzle
Framing protects your puzzle and makes it look polished and intentional. A good frame elevates the finished look from "craft project" to "gallery-quality art."
Framing serves multiple purposes. It protects against dust and fading. It creates a finished border that draws the eye. It lets you hang the puzzle safely without damage.
Selecting the Right Frame and Glazing
Frame size matters. Measure your puzzle precisely. Standard frame sizes exist, but custom frames fit puzzles perfectly. Custom costs more but looks better.
Material options:
- Wood frames feel warm and traditional
- Metal frames look modern and sleek
- Floating frames create a contemporary look
Glazing choices:
- Standard glass shows reflections but is affordable
- Non-glare glass reduces reflections but slightly softens the image
- UV-protective glass shields colors from fading
For puzzles with fine art prints like those from Lux Landscape Art, UV-protective glazing is worth the investment. It keeps colors vibrant for years.
Backing board: Use acid-free backing to prevent yellowing. Archival-quality boards protect your puzzle long-term.
Mounting inside the frame:
- Glued puzzles can be mounted directly on the backing board
- Unglued puzzles need support strips or acid-free tape to hold pieces
- Never use regular tape, it yellows and damages pieces over time
Measure twice. Frame once. A well-chosen frame transforms your puzzle into a piece you'll treasure.
How to Laminate a Puzzle for Protection
Lamination is one of several ways to preserve a finished puzzle, but it is not the right choice for every display. Before you laminate, weigh the trade-offs: lamination adds a plastic layer that can protect against moisture and handling, but it also changes the texture of the puzzle surface, may reduce the visibility of fine art details, and is difficult to reverse without damaging pieces. For puzzles you plan to frame and hang permanently, gluing and framing often provides better protection and a more polished look. For puzzles you want to display temporarily or rotate, a glue-free mounting method is usually more practical.
If you still prefer lamination, here is what to expect. Heat lamination uses a machine to seal a plastic film to the puzzle, typically at a print shop. Cold lamination uses self-adhesive sheets you apply at home. Both methods require a completely flat, dust-free puzzle and careful smoothing to avoid air bubbles. Heat lamination generally produces a smoother finish, while cold lamination is more accessible but prone to wrinkles if not applied slowly.
A key limitation: lamination does not make a puzzle rigid enough to hang on its own. You will still need to frame it or mount it on a backing board. Also, laminated puzzles can be heavier and may require stronger hanging hardware. For renters or anyone who might want to disassemble the puzzle later, lamination is not reversible, once sealed, the pieces are permanently bonded.
Puzzle Display Ideas for the Wall
Your finished puzzle deserves a prominent spot. Wall displays transform puzzles into focal points that guests notice and admire.
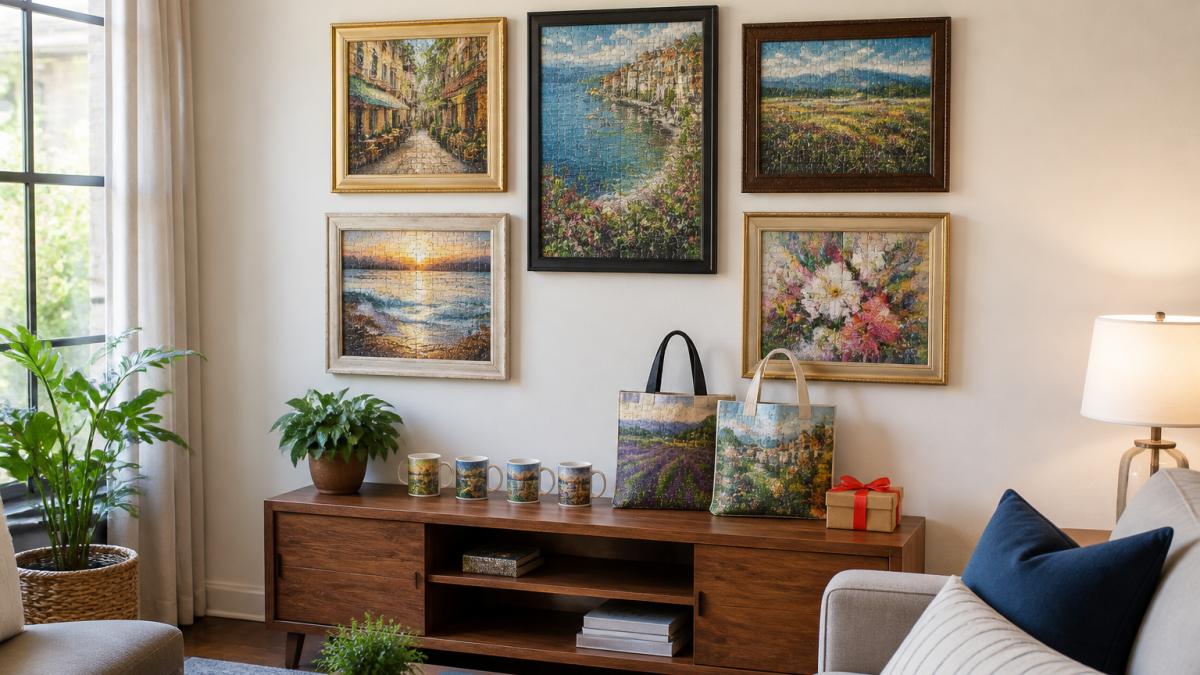
Gallery wall arrangements work beautifully for puzzles. Mix frame styles, sizes, and art themes. Hang them in a grid, salon-style, or asymmetrical pattern. Gallery walls let you display multiple puzzles as a curated collection.
Single statement displays make sense for large or particularly striking puzzles. Hang one oversized framed puzzle as the focal point above a sofa or bed. This approach works especially well for puzzles featuring bold landscape or abstract art from Lux Landscape Art.
Color coordination ties puzzles together visually. Group puzzles with similar color palettes. Or alternate warm and cool tones for contrast.
Spacing matters. Leave 2-3 inches between frames. Too close feels cramped. Too far apart breaks the visual connection.
Gallery Walls and Floating Shelves
Gallery walls let you combine puzzles with other art, photos, or decorative objects. This creates a personalized display that reflects your taste.
Planning your gallery wall:
- Lay frames on the floor first. Arrange them until the composition pleases you.
- Take a photo. This is your reference.
- Mark wall positions lightly with pencil.
- Hang frames level and secure.
Floating shelves offer flexibility. Lean framed puzzles against the wall on shelves. You can rotate puzzles seasonally or move them easily.
Shelves work well in bedrooms, home offices, or entryways. They're less permanent than wall-mounted displays but still showcase your puzzles beautifully.
Tabletop and Easel Displays
Not every puzzle needs to hang on a wall. Tabletop displays work in smaller spaces or for temporary showcases.
Easels prop puzzles upright on desks, shelves, or side tables. They're perfect for puzzles you want to admire up close. Easels are portable, move them whenever you want a change.
Picture ledges hold framed puzzles horizontally or leaning back slightly. They're ideal for rotating displays. Swap puzzles monthly to refresh your space without wall damage.
Floating frames can sit on shelves or tables. They create a modern look and work in minimalist spaces.
These methods suit people who rent, move frequently, or like to rearrange decor often.
Care and Long-Term Preservation
Your displayed puzzle needs protection to stay beautiful. Dust, sunlight, and humidity are the main threats.
Dust regularly. Use a soft brush or microfiber cloth. Gently dust framed puzzles every few weeks. Unframed puzzles on shelves need more frequent cleaning.
Avoid direct sunlight. UV rays fade colors over time. Position puzzles away from windows or use UV-protective glass and glazing. North-facing walls are ideal.
Control humidity. Excess moisture warps puzzle pieces. Keep puzzles away from bathrooms, kitchens, or damp basements. A humidity level between 30-50% is ideal.
Inspect periodically. Check for loose pieces, especially in unglued displays. Tighten any wall anchors or mounting hardware yearly.
Rotate displays. If you have multiple puzzles, rotate them every few months. This reduces fading on any single piece and keeps your decor fresh.
Store extras properly. If you remove a puzzle from display, store it flat in a box in a cool, dry place. Avoid plastic bags, they trap moisture.
With proper care, your displayed puzzle remains vibrant and beautiful for years. Fine art prints on puzzles from Lux Landscape Art are designed to last, and thoughtful display practices keep them looking gallery-quality.
Displaying your finished puzzle transforms hours of creative work into lasting home decor. Whether you frame it, glue it, laminate it, or use a reversible method, your puzzle deserves a place where you see it daily. Explore our collection of art printed puzzles, mugs, totes, and more to find pieces that match your style and budget. [Sign Up] to receive exclusive discounts and discover new designs perfect for your home or as thoughtful gifts for the art lovers in your life.
Frequently Asked Questions
Do you need to glue a puzzle before framing it?
Gluing is optional but recommended if you want a permanent, durable display. Glue prevents pieces from shifting or separating over time, especially if the frame is moved or jostled. For reversible displays or if you plan to change your puzzle art frequently, glue-free methods using transparent adhesive dots or mounting boards work well. Choose based on whether you want a long-term permanent display or a changeable one.
What's the best way to display art printed puzzles without damaging them?
Use a backing board and secure pieces gently with glue or adhesive dots rather than staples or pins that pierce the puzzle. Frame your finished puzzle with UV-protective glazing to prevent fading and dust damage. For wall-mounted displays, ensure the frame is securely anchored and the puzzle is protected from direct sunlight and moisture. Tabletop easels offer a safer option if you're concerned about wall installation.
Can I display a completed puzzle without a frame?
Yes. You can mount a finished puzzle on a flat board or backing board and hang it directly on the wall using picture ledges or floating shelves. Transparent adhesive dots hold pieces in place without damage. Alternatively, display your puzzle art on an easel on a side table or shelf for a temporary, changeable display. These glue-free methods work especially well for art printed puzzles you want to rotate seasonally or gift to friends.
How do I laminate a puzzle for protection?
Apply a clear laminate sheet over the assembled puzzle using a laminating machine, or use a self-adhesive laminate film applied by hand. This protects the puzzle from dust, fading, and damage while keeping the finished look intact. Alternatively, use a clear acrylic or polyester glazing inside a frame for protection without the permanent commitment of lamination. Both methods work well for art printed puzzles displayed in high-traffic areas or homes with children or pets.